Introduction
You'll find links to the source code for each page in the top-right corner of each page. If you would like to make contributions, please know that it's fully open source and open to webedits / pull requests.
Supersymmetry is a Minecraft modpack for 1.12.2 based around GregTech! But if you're here reading this, you probably already know that. What makes Supersymmetry any different from all those other packs?
Supersymmetry fundamentally chooses realism.
We believe that science can create engaging, interesting gameplay, and that there is a target audience of people who would be interested in playing a game based around the basic rules of the universe. The main reason why one would want to develop this modpack is because one wants to get modded Minecraft players interested not only in STEM, but the scientific method itself. No modpack strives as much to change the worldview of its audience for the better than Supersymmetry.
Supersymmetry creates an immersive industrial atmosphere for its players.
From the setting and lore of the game to the function and design of its machines, Supersymmetry attempts to create a cohesive brutalist and industrial backdrop for players to create on top of. We seek to create immersion through combat, lore, and adventure, and we seek to use Supersymmetry to combine GregTech progression with the steady conquest of outer space.
Supersymmetry is not afraid to take its time.
While releases for Supersymmetry do occur every two weeks, us developers perform large quantities of research into the scientific literature to inform our gameplay. We also take care to iteratively develop our game design in response to feedback from the community.
If you are interested in contributing to a modpack committed to realism, atmosphere, and quality, you are free to join us.
Contributing
This particular module is meant to introduce you to how you might begin making your first contributions to Supersymmetry. There are a few prerequisites that would be helpful for you to know, however:
- How to perform basic file operations on a personal computer
- How to install programs
- Some basic coding knowledge (especially in Java or other C-style programs)
- Collaborative Git/Github knowledge (commits, branches, merging, pull requests)
Getting Started
To set up a repository, we recommend installing IntelliJ IDEA Community Edition and the Java 8 JDK (which IntelliJ can help you install). Once you do this, you can create a new IDEA project by cloning one of our repositories. In fact, there is an option for this on the IDEA launch page.
Which repository do I clone?
If you want to tweak the configurations of mods or recipes, you'll want to use our main repository, SymmetricDevs/Supersymmetry. If you instead want to work with creating new multiblocks or other more complex features, you'll want to work on the core mod, which is found at SymmetricDevs/Susy-Core. You can learn more about the various repositories that Supersymmetry developers work on in Supersymmetry Projects
In order to actually clone it, you will want to select "Project from Version Control" in IDEA.
You can then navigate to the repository you want to clone in your browser and copy this URL found under the "Code" button:
Inserting that into the URL field in IDEA and then setting the main repository folder will start the process of downloading it onto your computer.
Working with SymmetricDevs/Supersymmetry
The modpack development cycle primarily works around building the modpack through a program called packwiz. Packwiz creates the ZIP files that can be imported into modpack launchers like PrismLauncher or ATLauncher. The Supersymmetry repository wraps packwiz using Python, which you'll need if you want to use packwiz most efficiently. You may download Python here.
Once you've downloaded Python, you may now build the pack. Open any command terminal to the directory in which the Supersymmetry repository is copied, and then run the following command:
Windows:
python3 build\main.py -c
Linux:
python3 build/main.py -c
(You may need to modify the above command based on what your Python command is named. Common names include python, python3, and python3.x.)
Once you've performed this command, look in the buildOut folder to see your client.zip! You may now import this into the modpack launcher of your choice. If you want a server instance, remove the -c argument in the command.
Running a test instance of Supersymmetry on PrismLauncher
One way to test in-development versions of Supersymmetry is to create an instance of Supersymmetry on PrismLauncher and then making the following modifications to the instance's minecraft folder:
- Replacing the
groovy,resources,structuresfolders using the command (on Linux)ln -s "FOLDER LOCATION" "SYMLINK LOCATION" - Replacing the Susy-Core mod (named Supersymmetry) with a compiled version using
ln -sin the same way.
Working with SymmetricDevs/Susy-Core
Susy-Core also has a build system known as Gradle (as is used for the majority of Minecraft mods).
Once you've cloned and entered the repository in IntelliJ IDEA, look for a notification in the bottom right that tells you to "Load Gradle Project." Once you click it, it will configure a set of commands you can use to test Susy-Core in a minimal environment. You can look for some particularly common ones in the top-right corner:
Selecting any of these will override the selected top-line command "Setup Workspace," allowing you to work more efficiently. Below are some important Gradle "run configurations" for you to know.
It is also possible to interface with Gradle over the command line, either by using ./gradlew to call commands or by using a system installation. We advise using a Gradle version of 8.9 with Java 21.0.2 at the current moment. To view all tasks from the command line, use gradle tasks.
2. Run Client
This particular command starts a client instance of Minecraft including Susy-Core and a few other mods required to load it (including GregTech and JEI). If you want to debug Susy-Core, you can click the green bug icon you see here:
Careful tracing of the code in debugging mode, involving setting breakpoints, going step-by-step through each line, and looking for points before the glitch has necessarily occurred are essential for finding and fixing bugs.
6. Build Jars
This command builds a set of JAR files in the build/libs folder. After navigating there, you'll notice quite a few files:
However, the only one that can be brought into your modpack's mods folder without issue is the one that does NOT have dev at the end of the name (the first one in the picture above). The others are deobfuscated files that only work with IntelliJ IDEA, and they will crash your game if you try to use them in a real modpack instance. (Also, I recommend clearing out this folder before running the command as to not get confused about which version to pick.)
Git for Dummies
Welcome to this short crash course on Git.
Why Git?
Git is what is known as a version control system, a piece of software that, as the name suggests, tracks "versions" of files. This is useful in that it allows many developers to coordinate development on a project without the need for extensive communication; edit your piece of the code, save it, and use Git to let everyone know about what you did. Additionally, having easy access to historical versions of a codebase streamlines bug-fixing and allows quick reversion to previous versions.
Git can be compared, in a way, to a "Wikipedia-style" editing methodology for filebases.
A particular strength of Git is its distributed nature, meaning that every person who works on a codebase using Git will have the entire codebase and its history stored locally. This further strengthens offline development and allows users to quickly make and review edits, as well as promoting greater accessibility for others to work on projects. This doesn't necessarily mean that there is no need for centralization; projects using distributed version control frequently use a central location to store data (e.g. GitHub).
Common Version Control Terminology
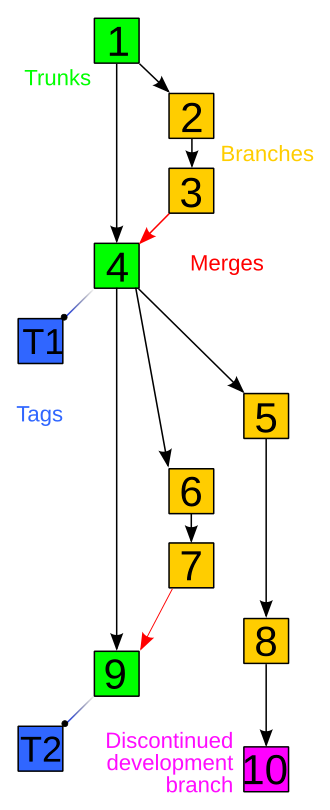 An example of a version control history tree. Sourced from https://commons.wikimedia.org/wiki/File:Revision_controlled_project_visualization.svg
Repository
Repository refers to a data structure storing metadata that points towards a file or directory structure.
You can think of this as a labeled list of all files along with a complete history of modifications to these files.
Branch
Branch is an independent separation of the codebase from another repository. This can also be referred to as a fork.
You can think of this as making a copy of another repository for separate development.
Commit
Commit can either be used to refer to a changeset as an object, or can be used to refer to make changes into a repository.
You can think of this as either talking about a specific change when used as a noun, or as a verb, changing something that is reflected in the repository.
Push
Push copies changes from one repository to another, initiated by the source repository.
Pull
Pull does the same as push but is initiated by the reciepient repository.
Pull request
Pull request asks for a source repository to combine the revisions made in a separately developed repository. This is referred to as merging. Pull requests frequently invovle discussion of the request.
Fetch
Fetch is identical to pull conceptually, however the git fetch command is behaviorally different from git pull as it does not automatically merge changes into your working branch.
Merge
Merge operations apply two sets of changes to file(s).
You can think of this as combining changes into a codebase.
Resolve
Resolve is a user intervention addressing change conflicts to a file.
Clone
Clone is creating a new repository using another repository as your base.
You can think of this as copying another repository for yourself.
Others
A more complete list can be found here.
Getting Started
Find your respective download of Git here.
Access the Git Command Line Interface (Git CLI). You should set a uniform username for your commits using a global flag, like below:
git config --global user.name "USERNAME"
GitHub (which Supersymmetry uses) prefers that you also set a commit email address to link your commits with your GitHub account.
git config --global user.email "EMAIL"
You can verify this information like so:
$ git config --global user.name
USERNAME

$ git config --global user.email
EMAIL
You may additionally authenticate with GitHub for security and ease of use reasons. You can use either GitHub CLI or Git Credential Manager (GCM).
If you would rather use a token-based authentication method, you may generate a GitHub personal access token. This can substitute your password when prompted by Git.
VSCode also supports Git integration and allows you to authenticate through the IDE.
If none of the above authentication methods are used, Git will prompt you for your GitHub password every time you do an action that requires authentication.
All of the above fall under the umbrella of HTTPS authentication. SSH can also be used for authentication.
Congratulations! You are ready to use Git.
Contributing to Supersymmetry
Download an instance of Supersymmetry from GitHub and import it into a Minecraft launcher (e.g. Prism Launcher).
Create a fork of Supersymmetry for your own development needs. This can be done through your web browser, desktop GitHub client, or the GitHub CLI.
Clone the forked repository. Point your instance path at the cloned repository. You can then run packwiz to download the necessary mods for running the client.
If you would like to sync your repository with the upstream Supersymmetry repository, you can run:
git remote add upstream https://github.com/SymmetricDevs/Supersymmetry
You can then run:
git pull upstream BRANCH
To pull the changes from the Supersymmetry repository. Running a regular git pull origin BRANCH command will pull from your forked repository. Usually this branch will be main.
You can now edit files within your instance directory as you see fit.
In order to now commit your changes back to your forked repository, you must first add files to be included in the commit. This is known as staging your changes. You can do this via the command:
git add FILE
You can add the -all or -A flag to indicate you want to commit all files. After adding files, you may commit them via:
git commit -m COMMIT_MESSAGE
Then push your changes to GitHub by using the command:
git push origin BRANCH
Once pushed, you may make a pull request on the Supersymmetry repository with your commits.
Happy contributing!
Project Structure
There are many, many different parts of the Supersymmetry project! These are some of the code bases that you can help contribute to:
GitHub Repositories
Supersymmetry
This is the main repository for the modpack! It contains configuration files for the modpack. This is where you'd contribute to the questbook, update recipes, add mods, etc.
Susy-Core
This repository contains the principal Java code for the modpack. It also contains all of the assets of the modpack. We use RetroFuturaGradle for the compilation.
Supercritical
This repository has our custom nuclear energy implementation. It contains nuclear-relevant recipes, items, multiblocks, and textures.
Dev-Docs
This repository contains the documentation for these projects as well as tutorials and tips for how to contribute! You can also press the edit button in the top-right corner if you want to start editing a page.
There are also a few projects of note from outside the SymmetricDevs organization.
GregTech
This is the mod that underpins our entire project! As of writing this (27 Aug 2025), this mod is still being ported to a new UI library, ModularUI. Help on this project makes our code more stable and efficient, and it attracts further attention to this version.
Modern Supersymmetry
In the future, it is planned to port Supersymmetry to modern versions of Minecraft, primarily for the higher level of support and attention that comes with it. However, as of writing this (27 Aug 2025), most of the developers working on this are busy with other tasks. Currently, work is planned to shift to this version more once LuV tier is reached.
Using Susy-Core
Most of the useful programming in the Supersymmetry mod is located in src/main/java/supersymmetry. We'll go over the most important folders there first, before covering the rest of the project structure.
The common folder
The common folder covers systems that both the Minecraft client and the Minecraft server need to use. If you're unfamiliar with these concepts, you can reference this link. Anyway, the common folder contains things such as advancements, blocks, entities, items, tile entities, meta-tile entities, UI widgets, etc.
Items (the items folder)
Items in many mods for Minecraft versions 1.12.2 and earlier have to contend with the item limit: the base game has a limited number of numerical IDs (4096) it can give to items. Susy-Core addresses this problem by indexing so-called "metaitems" with one item ID and many damage values. Minecraft 1.12.2 allows for up to 32,768 different values for durability, and it allows for each one to receive a different texture. This is why common/item/SusyMetaItems.java is where many items are stored. Within this file, each metaitem is declared as a MetaValueItem and is initialized in the method initMetaItem. The IDs given to each item in this method are unique and must not be changed. Otherwise, metaitems that players possess could mutate into another type of item when they update their Supersymmetry instance.
Tile Entities (the tileentities folder)
Tile entities are not physical entities, despite the name. Instead, they represent systems that are attached to a block. For example, in vanilla Minecraft, signs, furnaces, crafting tables, and beds have tile entities attached to them (that is, they implement ITileEntityProvider). As such, their job is to handle rendering and client-server communication. For example, when a GregTech-based tile entity is initialized as it is placed, the client calls writeInitialSyncData to initialize the tile entity on the server, and the server calls readInitialSyncData to process the information they received from the client. Another common pair of methods that must be implemented for tile entities is writeNBT and readNBT, for when the server saves and loads the tile entity from the world data. Tile entities are registered in common/tileentities/SusyTileEntities.java in the register method.
MTEs (the metatileentities folder)
MTEs are managed by GTCEU to implement common features that are useful to many GregTech machines. They are implemented similarly to GregTech-based tile entities, but they inherit from MetaTileEntity. They are registered in common/metatileentities/SuSyMetaTileEntities.java with a unique ID. MetaTileEntities can be given specialized UIs, and they can even represent special multiblocks!
Guides
Writing Quests
Quests are provided through Better Questing Unofficial.
To create a quest, one uses /bq_admin edit to toggle editing mode, and then one can freely edit the quests from there. Anyone working with this MUST, MUST run /bq_admin default save to record the quest data to the files. Don't do yourself dirty.
There are a few things to know when editing quests:
The language files for our quests are stored in config/betterquesting/resources/supersymmetry/lang.
BQ(U)Tweaker allows images and links to be embedded into quests.
To add links, use this format: {Embed}TypeLink;<WebsiteLink>;<DisplayWidth>;<DisplayHeight>;<ButtonText>{Embed}
As for images, use this: TypeImage;<ResourceLocation>;<DisplayWidth>;<DisplayHeight>;<ImageWidth>;<ImageHeight>{Embed}
Also, to edit quest lines and quests, look in the lower left-hand part of the chapter-viewing interface:

Writing Recipes
Recipes are written in GroovyScript. Here's an example:
MIXER.recipeBuilder()
        .fluidInputs(fluid('fermented_biomass') * 1000)
        .inputs(ore('nutrientPhosphorous'))
        .outputs(metaitem('fertilizer') * 5)
        .EUt(30)
        .duration(100)
        .buildAndRegister()
MIXER is a RecipeMap that is generated as such:
MIXER = recipemap('mixer')
To create a recipe, one has to call the recipeBuilder method first, which allows developers to add the properties of the recipe. The recipe is registered with the buildAndRegister recipe.
Conveniently, the voltage requirement of the recipe is determined by the EUt method.
Materials
Items that exist as a variant of a material are specified by the ore function with a string argument consisting of an ore prefix and a material, such as nutrientPhosphorous, foilPlastic, dustSilver, etc.
Material definitions and initializations can be found in groovy/material, and importantly, most of them contain sub-materials. SuSyMaterials.groovy defines all materials defined by the modpack and calls their initialization functions. Within FirstDegreeMaterials.groovy, the high-purity elements and materials that depend only on elements are initialized. SecondDegreeMaterials.groovy contains materials that depend on materials within FirstDegreeMaterials.groovy, and so on to avoid nasty errors. Materials of unknown or complex composition are initialized in UnknownCompositionMaterials.groovy. Sometimes, one needs to initialize materials in Susy-Core.
Metaitems
Metaitems can be thought of as individual item variants with unlocalized names and numerical IDs, meaning that one does have to be careful when merging. They are set up in SusyMetaItems.java, along with their tooltips and stack size.
Creating Multiblocks
A multiblock is implemented as a MetaTileEntity (GregTech's buffed tile entities). Therefore, all multiblocks have a controller block. However, we do not suggest that you use a MetaTileEntity superclass for most multiblocks. Usually, a RecipeMapMultiblockController or a MultiblockWithDisplayBase is what you want as the superclass.
When using a RecipeMapMultiblockController, you must create a field of SusyRecipeMaps and initialize it with a name to begin registering recipes in GroovyScript. The initialization is used to set up the GUI and the associated sounds. This is convenient, because appropriate recipe logic can be set up immediately based on the type argument.
For a MultiblockWithDisplayBase, the recipe system and GUI are customizable to a greater extent, but you will have to create them yourself.
Here is an example implementation of createStructurePattern for a launch pad.
